

Photo by Rubaitul Azad on Unsplash
How To Work with Multiple GitHub Accounts on a single Windows Machine - (Windows 11)


If you are reading this then chances are you have probably run into the same problem as I did. And like you, I did the same thing; Google it, yeah. I stumbled across a solution but sadly, it was specific to Mac and not Windows. I have provided the link to the Mac guide at the bottom of this article as a reference. You can check it out if your device is Mac. So I followed the step for Mac and used the correct commands that worked on my Windows 11. I decided to document the steps to help another Windows user or myself in the future, who knows!!! So here we go; it is divided into 5 steps:
Step 1: Create SSH keys for all accounts
Step 2: Add SSH keys to SSH Agent
Step 3: Add SSH public key to the GitHub
Step 4: Create a Config File and Make Host Entries
Step 5: Cloning GitHub repositories using different accounts
Create SSH keys for all accounts
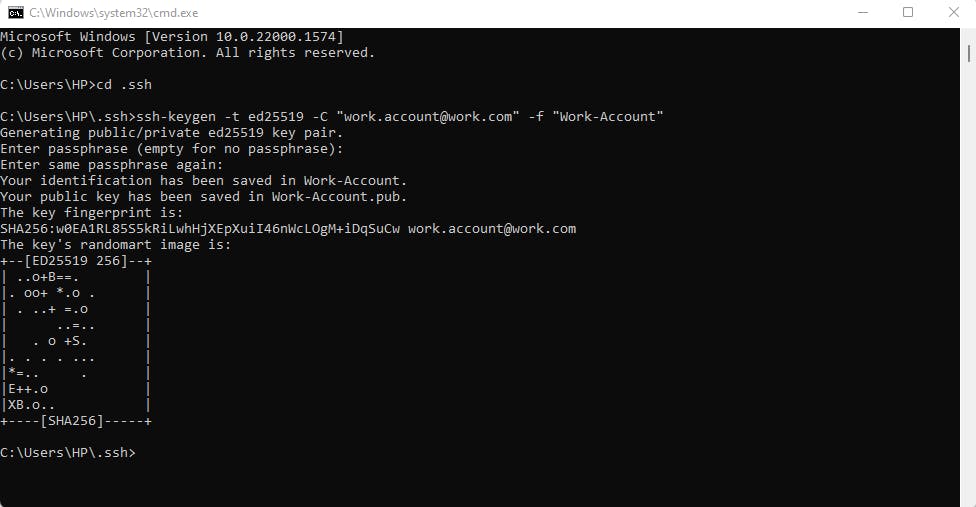
Open your terminal and navigate into the .ssh directory. cd C:\Users\USERNAME\.ssh You can create the .ssh file in that directory if doesn't already exist, then navigate into the directory. Create ssh keys with the following command:
ssh-keygen -t ed25519 -C "work.account@work.com" -f "Work-Account"ssh-keygen -t ed25519 -C "personal.account@gmail.com" -f "Personal-Account"
Add SSH keys to SSH Agent
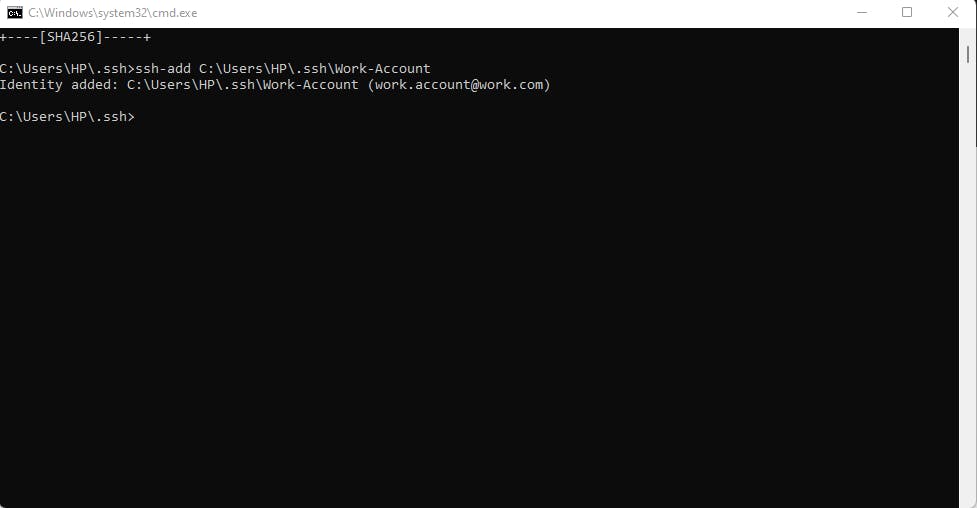
Run the commands below to add the different keys to SSH agent.
ssh-add C:\Users\HP\.ssh\Work-Accountssh-add C:\Users\HP\.ssh\Personal-Account
To get more context into what this does, you can read up here
If you get the error Error connecting to agent: No such file or directory, then you need to confirm if you have OpenSSH Authentication Agent service running
Your windows will have OpenSSH pre-installed. If it doesn't, you will need to install it. On your keyboard, hit the WIN + R button, in the box, type service.msc and hit ok. This will bring up the service app. Enable the OpenSSH Authentication Agent service and start it.
Add SSH public key to the GitHub
For the next step, we need to add our public key (that we generated in our previous step) and add it to the corresponding GitHub accounts.
For doing this we need to:
Copy the public key
We can copy the public key either by opening the Work-Account.pub file in a text editor on your machine and then copying the content of it.Paste the public key on GitHub
Sign in to GitHub or Paste this link in your browser (https://github.com/settings/keys) or click here
Click on New SSH Key and paste your copied key.
Create a Config File and Make Host Entries
The C:\Users\HP\.ssh\config file allows us to specify many config options for SSH.
If the config file does not already exist then create one (make sure you are in C:\Users\HP\.ssh directory). Open the file with a text editor on your machine, eg notepad++
Now we need to add these lines to the file, each block corresponding to each account we created earlier.
#office account
     Host github.com-work-account
          HostName github.com
          User git
          IdentityFile C:\Users\HP\.ssh\Work-Account

#personal account
     Host github.com-personal-account
          HostName github.com
          User git
          IdentityFile C:\Users\HP\.ssh\Personal-Account
Cloning GitHub repositories using different accounts
After completing the setup from step 1-4, next is to try to clone a repository with accounts that you have added.
From the folder where you want to clone the directory into, run the following command:
git clone git@github.com-{your-username}:{owner-user-name}/{the-repo-name}.git
Finally, from now on, to ensure that our commits and pushes from each repository on the system use the correct GitHub user — we will have to configure user.email and user.name in every repository freshly cloned or existing before.
To do this use the following commands.
git config user.email "work.account@work.com" git config user.name "Work Account"
git config user.email "personal.account@gmail.com" git config user.name "Personal Account"
Pick the correct pair for your repository accordingly.
To push or pull to the correct account we need to add the remote origin to the project and then use
git push
git pull
Reference: guide for mac